Sunday, 30 June 2013

End of Financial Year... Cake!

I know... I know what you're thinking: Geez, this woman really will use any excuse to bake! End of Financial Year Cake?? Puh-lease!

Well, this cake was actually suggested by my husband... Yep! The same husband who claims that I have an uncontrollable addiction to baking, which may end with one us needing therapy,* (N.B. Not my other husband, who absolutely loves seeing me constantly next to the oven, hovering over the kitchen bench, spreading flour and icing sugar everywhere, and who just can't get enough of me making delicious and amazing looking sweet things every. single. day)...

Hmm... Well. End of Financial Year - A time when many places hold sales, others just close up shop and go out partying... And me? Well, I just bake.


EOFY marks the first half of the year over... Bang. Gone. And now the glass is half empty.


I (because of my husband's suggestion) wanted this cake to be a giant cupcake, so that I could practice making giant chocolate patty cases... So after drawing some ideas,** I had concluded that the theme of this giant cupcake will be money, which turned into a rainbow, because money is kind of like a rainbow. See?


I showed said drawing to my husband, and once he'd finished rolling his eyes at the intensity (or in his words "stupidity") of what I wanted to make, he said "No one will get the money colour reference."

... So I added dollar signs to it :)


After that, I relied heavily on Cupcake Addiction's YouTube tutorials - and made:
My giant chocolate patty case :)


I know the colours aren't exactly on the money (ha, get it) but if I had more time, money (ha, again), and resources to re-do it, I still probably would have done it the same way... Except maybe make the pink on top a bit lighter. And the yellow a bit golden, and the green darker, okay okay, I'll stop. It was good practice making a giant cupcake!

I tied a ribbon around the base, because (I think) the weight of the cake was making it split a bit, and I wanted to give it a bit more support, and not have it fall to pieces as it sits on the train city-bound. It's a bonus that it also looks pretty:


Cake and tax returns... Yum.

Here it is (after surviving the train ride) with some little 'EOFY'
additions, set up at my husband's work place:


Happy End of Financial Year!!

* Or me needing to get myself a proper job.

** I generally draw my ideas now (some call it sketching, but mine rarely make any sense to anyone but me anyway), because it's much easier to visualise them, and it makes me feel more confident knowing exactly the way people want them to look like when I'm asked to make a cake.

Tuesday, 25 June 2013

Packaged with love...

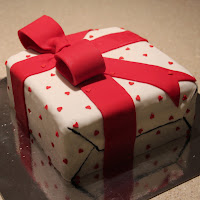
Great friends of ours very recently celebrated their wedding anniversary! Our (baked) gift to them, was a sugary parcel of chocolatey love :)

I knew I wanted this cake to look like a present, and I knew I wanted it to be chocolate (who doesn't like getting chocolate?), but it was quite a process to move from this idea in my head, to a physical reality on a cake board..

I began with a square (like a box) chocolate cake, iced.


With three children, I have had many, many years experience of wrapping up gifts. I figured that the same system would apply to wrapping a cake, and I was in denial right up to the point where I realised that this was a lot more challenging than I'd imagined it would be.

I somehow managed to save the dodgy wrapping job that I did by cutting bits and pieces away here and there, and by squishing other bits back into place... It was time to take a break and think a bit harder about the next step.


At midnight (after watching TV for a bit), that I realised that I could have totally covered the cake differently... I honestly did consider starting all over again, but thought that it would be better to just try and make do with and fix up what I'd already done instead of wasting time and ingredients. (I certainly wrote a mental note to store for next time). My new idea to fix what I saw as a disaster, was to draw the lines of where the 'wrapping' was folded over - which then turned into my mental note of not even worrying about having the fondant look like wrapping paper, because I could have just drawn lines on a cake covered normally!

... Next time, gadget.

I think I wanted this cake to look like a present so I could practice making bows. And I chose red, as it symbolises love (anniversary, remember?).

With rolled up paper towel, I looped a thick strap of red fondant around it, and then pleated the ends after gluing them together:


I drew the lines of the 'wrapping paper', just so that I felt better about the mess I'd made trying to fix the fondant that wouldn't wrap around the cake like paper would (duh). I started placing some thick red ribbon around it, and the cake then slowly begins to look more and more like how I imagined it would look like- yay!


I pleated the top layer of 'ribbon' on top of the cake, so that it would look more like the bow was tied with the same piece of ribbon (as it would on a normal present).


I set the bow up on top, but felt it was missing something...


So, I made some tails for the ribbon, and attached them underneath where the bow was going to be sitting, and pleated those as well:


I was happy with it so far... But even still, it felt like something was missing. There was too much white space, so I went hunting through my cake supplies looking for something that would help fill the gaps... Then found them- miniature, edible hearts :)

With my sugar glue and a paint brush, I attached these tiny little hearts one by one onto the cake:


You know what's funny? As I started gluing these little hearts on,
I couldn't help but be reminded of something like this:


The present (cake) was now finished! Wrapped, tagged, and ready to deliver to the happy couple we are so blessed to share a friendship with :)


Happy anniversary guys!! :)

Saturday, 22 June 2013

Glittery, elegant, and edible...

On a freezing Friday afternoon, I suddenly (surprise, surprise) dreamt of making some cake-pops. I dreamt of elegance, beauty, and love, and decided that a white rose would be apt for this creation... Though, white was really chosen, purely because I wasn't in the mood to colour chocolate and potentially risk it turning dodgy and being wasted...

The white rose symbolises purity, innocence, silence, humility, youthfulness, and heaven.

It also symbolises an intellectual resistance group in Nazi Germany, that became known for an anonymous leaflet and graffiti campaign, which called for active opposition to Adolf Hitler's regime...

How's that for research!

I quickly made the cake pops in my nifty little cake pop tray, and then put them in the fridge to cool down. Once cool enough, I covered them in melted white chocolate.

With an egg carton, a sharp knife, and a chopstick, a cake-pop transportation device suited for up to 12 cake pops was created:


While I waited for the chocolate to set, I made some green pipe cleaner leaves to decorate these roses (and to make it clear that they at least were some type of flower - or supposed to be)!

The 'rose' part of the cake pop was actually really easy! Basically, it was sparkle gel (I assume you could also use melted chocolate, but I was in a glittery mood), swirled around the cake pop from the middle, all the way up to the top.


Innocent, youthful Nazi resistance groups have never tasted so delicious ;)

Thursday, 20 June 2013

Once upon a time...

Once upon a time, there were two sisters, who were both about to have babies! One of them had a boy, and the other- a girl... Almost a year goes by, and those babies are about to turn one. I am asked to make a cake for them to celebrate this milestone age. The End.

Oh... You want a better story? Well, how about the story of what happened after I was asked to make this cake? ... It can be the sequal :)

Once upon a time not so long ago, it seemed that a new page had well and truly turned (so to speak) in my skills and abilities. Where it used to remain with cupcakes because I was far too scared to attempt anything bigger, I am managing just fine, and I love the opportunities to create new things!

This request was for a book cake- with one side blue, and the other- pink:


The names of the birthday children were written down, and I was set off on my way to think of more ideas around that, and create something special for this birthday...


I started that night by cutting out some blue stars. I added some green stars, as green & blue go well together... I had an idea earlier in the day for stars on the 'boys' side, and flowers on the 'girl' side, but I got a bit carried away (possibly in my tiredness) and after making pink fondant, I cut out more stars. I had plenty of coloured stars, and realised that I was meant to make pink flowers - Oops. Stars it will have to be.

Sadly, I needed to wait until the morning to get the book shaped cake tin and do some real cake making and decorating!


The next day had arrived, and I had no time for mistakes (as I only had 2 days to make it*), so in went 3 batches of vanilla cake mix into the book tin as I stood back and hoped that it would all work out alright!

Which it did. Praise God! After icing and covering the cake in fondant, I drew on some book pages with my new edible pen marker thingy... I thought this would be like, super easy, but it totally wasn't. The fondant was still soft, and my hand was a bit wobbly because I couldn't get a good enough angle to draw! For the straight parts, I used another square cake board as a guide, but when it came to the rounded ones, I found them very tricky... From afar it looks okay, and you can still see what my intention was!

... I might have to keep practicing ;)


I cut out the names of the birthday children, along with HAPPY 1ST BIRTHDAY (each in their respective colours), and glued them onto the cake. I randomly (but symmetrically) glued some stars around the page, and made 'exploding' stars in the top corners of the book cake, because everybody** loves exploding stars:


The final touch for the cake was blue & pink fondant rolled into long, thin strips, and glued around the base of the cake, to look like the book cover... Finally, to fill in the gap on the cake board (because they only come in circles or squares), I tied up a strip of star ribbon into a bow :)

A view of the finished cake from the back:


And the view from the front:


Happy 1st Birthday Samir Jan & Madina Jan!

I hope you and your parents enjoy this next chapter in life,
as you go from being a baby into being a little toddler person.

* I found this actually really great, because I had less time to stress over it / change my mind, and think of new things to make instead of the original plan... Only having a short amount of time put enough pressure on me to get it made, but not enough freedom to get distracted with other things I could put on it instead.

** Well, I do.
The End.

Sunday, 16 June 2013

One Year of Blogging!

I cannot believe it's been a whole year!
But strangely I can believe it's not butter ;)

If you've been following my blog, then you've surely read about many creative victories I've had, along with some baking fails and life tragedies... My children: Ben, Tamara & Jonathan have all turned a year older and celebrated their birthdays (and I've had and celebrated my own recently, too)...

You would surely have seen photos of the various hundreds of thousands of cupcakes that I've made for parties, play group, church, music festivals, friends, family, school, a wedding, or simply 'because I was bored' or 'had this great idea'...

You may have also seen, then, when I played dress ups, wrote a poem... and almost killed my dog.

I'm sure you've ultimately come to the conclusion that many others have also come to: I have a serious and unstoppable addiction to baking and decorating cupcakes & cakes...

But I refuse to admit it, or do anything about it!

Well, friends, it's been an entire year since I've been blogging. I've shared some creativity and ideas, tutorials, and stories about myself and my life. I want to say (well, technically write) a big THANK YOU for supporting me, reading my blog, sharing it with your friends, liking my Facebook page, and sending through photos of things you've made - I love seeing and encouraging the creativity in others as well!

I've made to celebrate a whole year of "Created Creatively". Made from just 2 ingredients! Stolen, but tweaked, from 4 Ingredients, I used vanilla cake mix, and orange Fanta.

I knew that I wanted the cake to look like the Blogger logo, so with orange and white fondant, and a cut-out of the 'B', I covered the cake:


I wonder what this next year of blogging will bring! I am excited, and hope you are, too, as I really enjoy sharing my creative journey with friends.

Have you had a favourite, or memorable post?? I would love to hear your thoughts on things you've liked, or not liked as much, and even things you'd like to see me create or blog about in the coming year!

Tuesday, 11 June 2013

The day when 1 + 1 + 1 = 1.

One month ago, I witnessed
a beautiful wedding...

I can't remember the last wedding I've been to where the conversations and direction of the service were so full of praise to Christ, and where humour and interaction with attendees made people feel comfortable and incredibly welcome. Everything was gospel centered, prayer was a big feature of the ceremony, and the love shown and given was truly inspirational :')

As a congratulatory present for the wonderful bride & groom, I decided to paint some champagne glasses.

With our printer not yet connected to the computer - I couldn't search and print any fancy wedding images, or hearts- sized up or down to fit the glasses... But, that actually probably worked out really well! I traced their names from the wedding invitation, and traced the double heart that was attached to the string that held the invitation and reception details together.

These were all the perfect size for the champagne glasses, and now the glass style matched the theme of the invitation. The only thing I had to make up myself was the date (the style of the date, not the actual date of the wedding) ;)

I love themed weddings. And before you start thinking that it was fancy dress and that people came wearing outrageous attire or anything like that - on the back of the double heart rope picture, was this verse from Ecclesiastes:

"... A cord of three strands is not quickly broken."

Now, at this wedding were many engineers, who know very well that 1 + 1 does not equal 1; and 1 + 1 + 1 certainly does not equal 1... But the Bible, and it's explanation of marriage that day (even the concept of the Trinity) looks a bit like this equation. I will stop trying to describe the words said on the day because I will mess it up and take the beauty out of what the pastor taught. But, with Christ in the centre of marriage, two strands become three (and three become one), and they are not quickly broken!

And, by themed - it was behind the idea of string... There was string wrapped around drink bottles and vases; string holding the service outline together, and it was such an amazing ceremony and reception, unlike any other wedding I've been to - I think because Christ and his love was shared so openly and confidently throughout it all...

Here are the two matching champagne glasses that I made for the bride & groom, along with the picture of the double heart that was traced (and the string that held it all together):


I used baking paper to trace the names, and then put them inside the glasses, and used a sock (a very clean sock!) to force the baking paper closer to the edge of the glass so that I could trace / paint them easier.


We very much enjoyed being a part of this special day of our friends, and we trust that all that was said about their love, and about Christ's love, will be evident in their relationship for many many years to come!

Congratulations Joanna & Papa Ewusie!

Sunday, 9 June 2013

Oh. My. Smurf-ness.

So word got out. I don't know how this happened. I blame the internet.

Apparently someone found out that I make cakes. Perhaps it was the photos. Or the recent promotion of my Facebook page. Or the fact that when people say "what you do with yourself?" my husband jumps in and says "indulges an obsession with baked goods, butter, and enough sugar that it represents the harvest of small Latin American countries."

But he's a jerk, so I ignore him :p

I've attempted to make Smurf cupcakes before (earlier this year for Neighbour day), and so already knew the areas I needed to improve on if I was to try those again. Like, I made notes and all. It's not an addiction. I can quit any time I want.

But this was an order. An order for Smurfs.
A cake. A mushroom house. Fondant. Papa.

I sketched the idea I'd had (for a cake & cupcakes set-up):

This is a representation of the Smurf Village in grass.
Husband says it looks like Gargamel finally set fire to it. 
I had visualised this again and again so that I knew exactly what I was going to do. It then came time to make it. The cake and mushroom house were fairly simple things to cover with fondant... For the mushroom house, I baked in a ramekin and a small glass mixing bowl:


Meanwhile, I had this crazy idea for the cupcakes! Smurf head cake pops attached to cupcakes! It was an idea so crazy it could work (and look great - I'd already imagined the success- until Husband said this went well with the "burning down the village" theme); I was taking a risk, though, as I had never made cake pops before (though have always been keen to start trying). I rolled out balls of white fondant at 15g each to make the hats. These were pretty easy (I did watch a YouTube tutorial however). Then used the cake pop tray upside down and covered with cling wrap, as their drying platform, so that they would still be the same shape:

Smurf Hats. Not albino nipples. Husband. 
So far, I had this:
Knock Knock. Who's There?
Gargamel.
Gargamel Who?
Gargamel set fire to your village.
Time to attempt the cake pops Smurf heads! As much as I wanted 30 of these, I am happy that I had managed 10 decent ones before the chocolate lost its smoothness (N.B. you need special colouring ingredients if you want to colour white chocolate! And lots of spare white chocolate melts)... The hats were attached, the eyed, noses, and ears were glued on, and these balls of chocolate and sugar goodness were now looking like those little blue make-believe creatures we all love. Well, the heads of them anyway:

Youuu... Ought-a beee... Decapitated.
But because I only had 10, I needed to quickly come up with Plan B for the rest of the cupcakes! So, using some dark green, white, & red fondant, a star cookie cutter, and fudge frosting, I created some mini mushroom houses, on patches of green 'grass'. Then with fudge frosting, I drew on their doors. It totally worked with the theme, though, because now there will be a Smurf village!

Switching back and forth from the cupcakes to the cake, I found myself wondering _____. ... That's not a mistype. I don't even know what I was wondering at this point. Was I wondering if I was a Martian princess sent here to bake until the world reached universal peace?

I threw the camera at Husband and said "make yourself useful, and make my Smurfs look amazing on film." Thirty seconds later, I could hear him near the table saying "you're a llama, you're a tiger, oh yeah, give me pouty, more pouty, NO! NO!" in a bad Austin Powers impersonation. Four children... I have four children. Not three and a husband.

"How the heck do I fit in there? My head's bigger than the door!"
The last things I needed to do was ice the cupcakes, attach the Smurfs & mushroom houses, and paint a birthday message on the top of the mushroom house that I'd later added white spots to.

My house had now exploded in a fine mist of flour, fondant colouring, rolling pins, and icing sugar. Husband wiped down the bench and the red colouring got all through the sponge. Then he answered the door when our neighbour knocked and told them he was just cleaning up all the blood... He's lucky I don't believe in divorce.

But 10 hours of obsession later, and we were ready for delivery.
Giant Smurf heads, and teeny tiny mushroom houses :)


See? It's grass. Not fire after all... Totally kept it PG. 
Here's a photo of the set-up from the party:

OK, so someone did light a fire next to the house... But it wasn't me. 
 La, la, lala, la la; Haaappy birthday Shaheer!