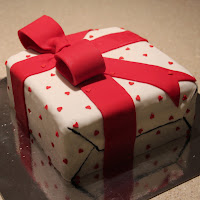
Great friends of ours very recently celebrated their wedding anniversary! Our (baked) gift to them, was a sugary parcel of chocolatey love :)
I knew I wanted this cake to look like a present, and I knew I wanted it to be chocolate (who doesn't like getting chocolate?), but it was quite a process to move from this idea in my head, to a physical reality on a cake board..
I began with a square (like a box) chocolate cake, iced.
I knew I wanted this cake to look like a present, and I knew I wanted it to be chocolate (who doesn't like getting chocolate?), but it was quite a process to move from this idea in my head, to a physical reality on a cake board..
I began with a square (like a box) chocolate cake, iced.
With three children, I have had many, many years experience of wrapping up gifts. I figured that the same system would apply to wrapping a cake, and I was in denial right up to the point where I realised that this was a lot more challenging than I'd imagined it would be.
I somehow managed to save the dodgy wrapping job that I did by cutting bits and pieces away here and there, and by squishing other bits back into place... It was time to take a break and think a bit harder about the next step.
I somehow managed to save the dodgy wrapping job that I did by cutting bits and pieces away here and there, and by squishing other bits back into place... It was time to take a break and think a bit harder about the next step.
At midnight (after watching TV for a bit), that I realised that I could have totally covered the cake differently... I honestly did consider starting all over again, but thought that it would be better to just try and make do with and fix up what I'd already done instead of wasting time and ingredients. (I certainly wrote a mental note to store for next time). My new idea to fix what I saw as a disaster, was to draw the lines of where the 'wrapping' was folded over - which then turned into my mental note of not even worrying about having the fondant look like wrapping paper, because I could have just drawn lines on a cake covered normally!
I think I wanted this cake to look like a present so I could practice making bows. And I chose red, as it symbolises love (anniversary, remember?).
With rolled up paper towel, I looped a thick strap of red fondant around it, and then pleated the ends after gluing them together:
... Next time, gadget.
I think I wanted this cake to look like a present so I could practice making bows. And I chose red, as it symbolises love (anniversary, remember?).
With rolled up paper towel, I looped a thick strap of red fondant around it, and then pleated the ends after gluing them together:
I drew the lines of the 'wrapping paper', just so that I felt better about the mess I'd made trying to fix the fondant that wouldn't wrap around the cake like paper would (duh). I started placing some thick red ribbon around it, and the cake then slowly begins to look more and more like how I imagined it would look like- yay!
I pleated the top layer of 'ribbon' on top of the cake, so that it would look more like the bow was tied with the same piece of ribbon (as it would on a normal present).
I set the bow up on top, but felt it was missing something...
So, I made some tails for the ribbon, and attached them underneath where the bow was going to be sitting, and pleated those as well:
I was happy with it so far... But even still, it felt like something was missing. There was too much white space, so I went hunting through my cake supplies looking for something that would help fill the gaps... Then found them- miniature, edible hearts :)
With my sugar glue and a paint brush, I attached these tiny little hearts one by one onto the cake:
You know what's funny? As I started gluing these little hearts on,
I couldn't help but be reminded of something like this:
The present (cake) was now finished! Wrapped, tagged, and ready to deliver to the happy couple we are so blessed to share a friendship with :)
Happy anniversary guys!! :)


Thank you!
ReplyDelete